

quarta-feira, 8 de dezembro de 2010
terça-feira, 30 de novembro de 2010
My New Website up! Meu novo site do Google no ar!
Tweet
Hyia folks, I just created another web site to host my tutorials. The older one has blocked by Google and unfortunatelly I don't know why. So You can see now the best Christmas tutorials I made, and I'll post all the others ASAP. Anyway it will take a long time to host all my tuts there. So you must be patient.
Thanks so much for your support.
Best Regards.
Olá pessoal, eu acabei de criar um novo site para hospedar meus tutoriais. O antigo como vocês já devem ter percebido foi bloqueado pelo Google e até hoje não consegui recuperá-lo. Portanto a partir de agora todos os meus tutoriais estarão disponíveis no site abaixo. Por enquanto só coloquei os tutos de Natal. Posteriormente colocarei os demais, mas vai levar algum tempo porque são muitos!!
Agradeço desde já a compreensão de vocês.
Abraços.
sexta-feira, 26 de novembro de 2010
Tutorial Christmas Time
Tweet

A tube of your choice. I used the FTU art by ©Malcolm, you can get it you become a member of groups that have permission from the artist to use his art. Example of a group that I belong and that is allowed: DragonsLairTubes HERE
Scrap kit PTU Christmas Time by Bea creations, that you can purchase HERE
Masks Vix_ChristmasMask5 and mask dmsk00067, that you can get HERE e HERE
A font of your choice. I used a font called Christmas
Program PSP X or higher (you can use older versions too)
Let's Go!!!!
:::I hope you've liked it:::
Until the next tutorial!
http://maryclovertagsetutos.blogspot.com/
Tube: © Malcolm
http://malberri.deviantart.com
Scrap kit: Christmas Time
http://beacreations.blogspot.com/
Font: Christmas
Created by Maryclover in 26th November 2010

Materials:
A tube of your choice. I used the FTU art by ©Malcolm, you can get it you become a member of groups that have permission from the artist to use his art. Example of a group that I belong and that is allowed: DragonsLairTubes HERE
Scrap kit PTU Christmas Time by Bea creations, that you can purchase HERE
Masks Vix_ChristmasMask5 and mask dmsk00067, that you can get HERE e HERE
A font of your choice. I used a font called Christmas
Program PSP X or higher (you can use older versions too)
Let's Go!!!!
1 - Open a transparent image 600 X 500 and paint it white
2 - Open the paper pp07_bc_christmastime. Apply the mask Vix_ChristmasMask5. Merge Group. Open the paper pp06_bc_christmastime, copy and paste as new layer. Apply the mask dmsk00067
3 - Open the frame01_bc_christmastime, copy and paste as new layer. Resize 95%. Go to Selections / Modify / Expand and place 7. Selections / Invert
4 - Open the paper pp01_bc_christmastime, copy and paste as new layer below the frame. Resize 80%. Press Delete. Selections / Select None
5 - Open candle01_bc_christmastime element, copy and paste as new layer. Resize 50%. Place the bottom left corner of the frame
6 - Open angels02_bc_christmastime element, copy and paste as new layer. Resize 50%. Place on bottom right of frame
7 - Open flower02_bc_christmastime element, copy and paste as new layer. Resize 80%. Place the bottom of the frame. Go to Image / Free Rotate / Right 90 º
8 - Open flower03_bc_christmastime element, copy and paste as new layer and place in the top left corner of the frame. Resize 70%. Duplicate and Mirror
9 - Open ribbon01_bc_christmastime element, copy and paste as new layer and place in the top left side of frame. Resize 70%. Duplicate and Mirror. Straighten
10 - Open your tube, copy and paste as new layer. Resize as desired and arrange on the frame
11 - Apply Drop shadow on all elements in the tube and settings: 3,2,35,5 12 - Sign and the credits and go to Layers / Merge All in JPG.
:::I hope you've liked it:::
Until the next tutorial!
Credits:
Art e Formatting by Maryclover
Tutorial by Marycloverhttp://maryclovertagsetutos.blogspot.com/
Tube: © Malcolm
http://malberri.deviantart.com
Scrap kit: Christmas Time
http://beacreations.blogspot.com/
Font: Christmas
Created by Maryclover in 26th November 2010
NOT PERMITTED:
Rename, edit or convert my Stats on Tags.
You may not modify my creations and remove my credits. Any resemblance to another tutorial is purely coincidental.
All material used in my tutorials are free, except when it is created for Designers' CT.
It is forbidden copy in whole or in part, or rewrite your credit as my tutorials.
It is forbidden to publish in groups, websites or blogs without my permission, to contact both the e-mail marirbarbosa85@gmail.com
If you run the tutorial do not forget to give credit for putting my name and link of the page http://maryclovertagsetutos.blogspot.com/
This and other tutorials are part of my blog http://maryclovertagsetutos.blogspot.com/
By using the formatting is consistent to keep the credits.
No Copyright Infringement Intended
quinta-feira, 11 de novembro de 2010
Tutorial Classy & Fabulous
Tweet

A tube of your choice. I used the tube FTU by ©Maribel, that you can get if you're a member of groups that have permission from the artist to use her art. Example of a group that I belong and that is allowed: DragonsLairTubes HERE
Scrap kit PTU Classy & Fabulous by Candy Treats, that you can purchase HERE
Masks 210 InsatiableDreams, that you can get HERE
A font of your choice. I used a font called AlexBrush
Program PSP X or higher (you can use older versions too)
Animation Shop 3
Let's Go!!!!
:::I hope you've liked it:::
Until the next tutorial!
http://maryclovertagsetutos.blogspot.com/
Tube: ©Maribel
http://candystreats.blogspot.com/
Font: AlexBrush
Created by Maryclover in 11th November 2010
Materials:
A tube of your choice. I used the tube FTU by ©Maribel, that you can get if you're a member of groups that have permission from the artist to use her art. Example of a group that I belong and that is allowed: DragonsLairTubes HERE
Scrap kit PTU Classy & Fabulous by Candy Treats, that you can purchase HERE
Masks 210 InsatiableDreams, that you can get HERE
A font of your choice. I used a font called AlexBrush
Program PSP X or higher (you can use older versions too)
Animation Shop 3
Let's Go!!!!
1 - Open a transparent image 600 X 500 and paint it white
2 - Open-TOCpaper8 CandysTreats paper. Apply the mask 210InsatiableDreams. Merge Group. Duplicate the mask. 3 - Open-frame CandysTreats Cluster7, copy and paste as new layer. Resize 90%. Go to Selections / Modify / Expand and place 6.
4 - Add a new layer below the frame. Choose a color that matches the frame or tube and paint this layer. Go to Selections / Select None
5 - Open your tube, copy and paste as new layer. Resize as desired and arrange on the frame. Copy and paste the tube again and let in only the frame profile. Go to Image / Mirror. Delete scraps that were left outside the frame. In duplicate layer of the tube profile, go to adjust / blur / Gaussian blur and set 3. In the same layer change the blend mode to soft light and leave the opacity at 71. In the original layer change the blend mode to screen and apply the plugin Xero / Radiance. Choose the option you prefer by clicking the Random. Then click Ok
6 - Open-TOC-element CandysTreats OVERLAY, copy and paste as new layer above the tube close-up. Straighten the frame, turn off the scraps that were left off the frame and the opacity to 50%
7 - Open-toc-element CandysTreats FlowerCluster, resize to 500 pixels. Copy and paste as new layer below the paper. Place the bottom of the frame
8 - Open-TOCFlower2 CandysTreats element, resize to 100 pixels, with All Layers and Lock Aspect Ratio marked. Copy and paste as new layer and position in the lower right corner of the frame. Duplicate and Mirror
9 - Open-element CandysTreats TOCFlower7, resized to 100 pixels and Lock All Layers Aspect Ratio marked. Copy and paste as new layer below the element Previous year and place it in the bottom right corner of the tag. Duplicate and Mirror
10 - Open-toc element CandysTreats staple2, resize to 100 pixels, with All Layers and Lock Aspect Ratio marked. Copy and paste as new layer. Position supeior left corner of the frame
11 Apply Drop shadow on all elements in the tube and settings: 4 / 3 / 50 / 6.00
12 - Sign and the credits and go to Layers / Merge All in JPG. If you prefer to do the animation, just take the layers without the tube close up for the Animation. Then go back to PSP and open the visibility of two layers that were previously closed. Copy Merged and Paste After Current Frame AS. Click the first frame and go to Insert Image Transiction and choose Fade. In the last frame to change the Frame Properties 100. Here's how the animation and save as Gif.
:::I hope you've liked it:::
Until the next tutorial!
Credits:
Art e Formatting by Maryclover
Tutorial by Marycloverhttp://maryclovertagsetutos.blogspot.com/
Tube: ©Maribel
http://princesselemmiriel.deviantart.comScrap kit: Classy & Fabulous by Candy Treats
http://candystreats.blogspot.com/
Font: AlexBrush
Created by Maryclover in 11th November 2010
NOT PERMITTED:
Rename, edit or convert my Stats on Tags.
You may not modify my creations and remove my credits. Any resemblance to another tutorial is purely coincidental.
All material used in my tutorials are free, except when it is created for Designers' CT.
It is forbidden copy in whole or in part, or rewrite your credit as my tutorials.
It is forbidden to publish in groups, websites or blogs without my permission, to contact both the e-mail marirbarbosa85@gmail.com
If you run the tutorial do not forget to give credit for putting my name and link of the page http://maryclovertagsetutos.blogspot.com/
This and other tutorials are part of my blog http://maryclovertagsetutos.blogspot.com/
By using the formatting is consistent to keep the credits.
Rename, edit or convert my Stats on Tags.
You may not modify my creations and remove my credits. Any resemblance to another tutorial is purely coincidental.
All material used in my tutorials are free, except when it is created for Designers' CT.
It is forbidden copy in whole or in part, or rewrite your credit as my tutorials.
It is forbidden to publish in groups, websites or blogs without my permission, to contact both the e-mail marirbarbosa85@gmail.com
If you run the tutorial do not forget to give credit for putting my name and link of the page http://maryclovertagsetutos.blogspot.com/
This and other tutorials are part of my blog http://maryclovertagsetutos.blogspot.com/
By using the formatting is consistent to keep the credits.
No Copyright Infringement Intended
quarta-feira, 10 de novembro de 2010
Tutorial Thanksgiving
Tweet


Materials:
A tube of your choice. I used the PTU tube by ©Lady Mishka, artist's link HERE. You need to purchase the tube before you use it at PicksForDesign.com, link HERE
You must not use that tube if you don't have a license number first.
Scrap kit PTU autumn-sunset by Bits'N'Bobs, that you can purchase at MTA - My Tubed Art, link HERE
Wordart of your choice. If you want to use the one's on the tag above, you can get HERE
Program PSP X or higherLet's Go!!!
1 - Open a transparent image 600 X 500 and paint in white
2 - Open the paper-paper BNB-3, copy and paste as new layer. Apply the mask WSL_Mask307 and Merge Group.
3 - Open-frame by frame BNB-3, copy and paste as new layer. Resize 80%.
4 - Open the role BNB-journal-1, copy and paste as new layer below the previous frame.
5 - Open element BNB-39-element, copy and paste as new layer and resize 60%. Place the right side of frame 6 - Open the tube you choose, copy and paste as new layer. Resize as desired and arrange on the frame.
7 - Open element BNB-37-element, copy and paste as new layer. Straighten the left corner of the frame or wherever you prefer. Resize 70%. Lean a little to the left with the Deform tool
8 - Apply Drop Shadow on all elements in the configuration: 4 / 3 / 50 / 6.00
9 - Place your preferred Wordarts I used or if you prefer. Sign and tag in the credits. Go to Layers / Merge All. Save it in Jpeg.
::: I hope you've liked it:::
Until the next tutorial!
Until the next tutorial!
Credits:
Art and Formatting by Maryclover
Tutorial by Maryclover
http://maryclovertagsetutos.blogspot.com/
Tube: ©Lady Mishka
http://ladymishka.blogspot.com/
http://www.picsfordesign.com/
Scrap kit: PTU autumn-sunset by Bits'N'Bobs
http://scrappingbits.blogspot.com/
http://www.mistakenart.com/
Font: Bouquet
Created by Maryclover® in November 10th, 2010
http://maryclovertagsetutos.blogspot.com/
Tube: ©Lady Mishka
http://ladymishka.blogspot.com/
http://www.picsfordesign.com/
Scrap kit: PTU autumn-sunset by Bits'N'Bobs
http://scrappingbits.blogspot.com/
http://www.mistakenart.com/
Font: Bouquet
Created by Maryclover® in November 10th, 2010
NOT PERMITTED: Rename, edit or convert my Stats on Tags.
You may not modify my creations and remove my credits.
Any resemblance to another tutorial is purely coincidental.
All material used in my tutorials are free, except when it is created for Designers' CT.
It is forbidden copy in whole or in part, or rewrite your credit as my tutorials.
It is forbidden to publish in groups, websites or blogs without my permission, to contact both the e-mail marirbarbosa85@gmail.com
If you run the tutorial do not forget to give credit for putting my name and link of the page http://maryclovertagsetutos.blogspot.com/
This and other tutorials are part of my blog http://maryclovertagsetutos.blogspot.com/
By using the formatting is consistent to keep the credits.
No Copyright Infringement Intended
Personal Use Only - Not For Profit!
TWI Proud Member
segunda-feira, 1 de novembro de 2010
Tutorial Til Death Do Us Part
Tweet

A tube of your choice. I used the FTU tube by ©Warren Louw, artist's link HERE. To use this and other tubes must be part of groups that have the permission of the artist to use them. Example of a group that I belong to: The Zone Group, link HERE
Scrap kit PTU Til Death Do Us Part by Pink Princess Scraps, that you can purchase HERE
Masks 318InsatiableDreams e Vix_Mask205, that you can get HERE
and HERE
Programa PSP X or higher
http://maryclovertagsetutos.blogspot.com/
Tube: © Warren Louw
http://warrenlouw.deviantart.com/
Scrap kit: PTU Til Death Do Us Part by Pink Princess Scraps
http://pinkprincessscraps.blogspot.com/
Font: Evanescent
Created by Maryclover in 1st November 2010

Materials:
A tube of your choice. I used the FTU tube by ©Warren Louw, artist's link HERE. To use this and other tubes must be part of groups that have the permission of the artist to use them. Example of a group that I belong to: The Zone Group, link HERE
Scrap kit PTU Til Death Do Us Part by Pink Princess Scraps, that you can purchase HERE
Masks 318InsatiableDreams e Vix_Mask205, that you can get HERE
and HERE
Programa PSP X or higher
Let's Go!!!!
1 - Open a transparent image 650 X 600 and paint it white
2 - Open the paper PP8, copy and paste as new layer. Apply the mask 318InsatiabelDreams. Merge Group, and arrange with the Deform tool. Open the paper PP4, copy and paste as new layer. Apply the mask Vix_Mask205
3 - Open Frame ele65, copy and paste as new layer. Resize 80%. Click on it with the Magic Wand tool, go to Selections / Modify / Expand and place 7. Selections / Invert
April
4- Open PP6 paper, copy and paste as new layer below the frame. Resize to 400 pixels. Press Delete. Selections / Select none
5 - Open the tube you choose, copy and paste as new layer below the frame (if you use the same tube). Resize and arrange as desired.
6 - Open ele64 element, copy and paste as new layer. Resize to 250 pixels Straighten the top left of the frame. Duplicate and mirror
7 - Open ele44 element, copy and paste as new layer. Resize to 200 pixels. Copy and paste as new layer. Place the bottom right corner of the frame.
8 - Open ele2 element, resize to 200 pixels. Copy and paste as new layer. Place the left corner of frame.
9 - Open ele49 element. resize to 150 pixels. Copy and paste as new layer. Place the bottom left corner of the frame.
10 - Open ele40 element. resize to 100 pixels. Copy and paste as new layer. Place the bottom of the frame. Duplicate and mirror.
11 - Apply Drop Shadow on all elements in the settings: 4 / 3 / 50 / 6.00
12 - Sign and tag in the credits. Go to Layers / Merge All to Save Jpeg.
:::I hope you've liked it:::
Until the next tutorial!
Until the next tutorial!
Credits:
Art e Formatting by Maryclover
Tutorial by Marycloverhttp://maryclovertagsetutos.blogspot.com/
Tube: © Warren Louw
http://warrenlouw.deviantart.com/
Scrap kit: PTU Til Death Do Us Part by Pink Princess Scraps
http://pinkprincessscraps.blogspot.com/
Font: Evanescent
Created by Maryclover in 1st November 2010
NOT PERMITTED:
Rename, edit or convert my Stats on Tags.
You may not modify my creations and remove my credits. Any resemblance to another tutorial is purely coincidental.
All material used in my tutorials are free, except when it is created for Designers' CT.
It is forbidden copy in whole or in part, or rewrite your credit as my tutorials.
It is forbidden to publish in groups, websites or blogs without my permission, to contact both the e-mail marirbarbosa85@gmail.com
If you run the tutorial do not forget to give credit for putting my name and link of the page http://maryclovertagsetutos.blogspot.com/
This and other tutorials are part of my blog http://maryclovertagsetutos.blogspot.com/
By using the formatting is consistent to keep the credits.
Rename, edit or convert my Stats on Tags.
You may not modify my creations and remove my credits. Any resemblance to another tutorial is purely coincidental.
All material used in my tutorials are free, except when it is created for Designers' CT.
It is forbidden copy in whole or in part, or rewrite your credit as my tutorials.
It is forbidden to publish in groups, websites or blogs without my permission, to contact both the e-mail marirbarbosa85@gmail.com
If you run the tutorial do not forget to give credit for putting my name and link of the page http://maryclovertagsetutos.blogspot.com/
This and other tutorials are part of my blog http://maryclovertagsetutos.blogspot.com/
By using the formatting is consistent to keep the credits.
No Copyright Infringement Intended
terça-feira, 19 de outubro de 2010
Tutorial Trick or Treat
Tweet

1 - Open a transparent image 650 X 500 and paint it white
2 - Open-paper8 PDS_W paper, copy and paste as new layer. Apply the mask Vix_Mask405
Materials:
A tube of your choice. I used the PTU tube by ©Amberly Berendson, artist's link HERE. You need to purchase the tube before you use it at MTA (called Mistaken Art before), link HERE
You must not use that tube if you don't have a license number first.
Scrap kit Freebie Wicked by PolkaDot Scraps by Chassity, that you can get HERE
Program PSP X or higher
Animation Shop 3
Font JoliScript or another of your choice (use on the name Eye Candy 4000/Gradiente Glow plugin)
Click on the image to see it higher
Let's Go!!!
1 - Open a transparent image 650 X 500 and paint it white
2 - Open-paper8 PDS_W paper, copy and paste as new layer. Apply the mask Vix_Mask405
3 - Open-frame PDS_W frame5, copy and paste as new layer. Resize 85%. Click the first frame with the Magic Wand tool and go to Selections / Modify / Expand and place 5. Selections / Invert
4 - Open-Paper7 PDS_W paper, copy and paste as new layer below the frame. Press Delete
5 - Open the tube you choose, copy and paste as new layer. Resize as desired and arrange on the frame
6 - Open-element PDS_W element31, copy and paste as new layer below the frame. Position on the left side of the frame, and double mirror
7 - Open-element PDS_W element21, copy and paste as new layer. Resize 80%. Straighten the left side of the frame and delete the excess. Duplicate and Mirror
6 - Open-element PDS_W element31, copy and paste as new layer below the frame. Position on the left side of the frame, and double mirror
7 - Open-element PDS_W element21, copy and paste as new layer. Resize 80%. Straighten the left side of the frame and delete the excess. Duplicate and Mirror
8 - Open-element PDS_W element22, copy and paste as new layer. Resize 80%. Set up the loop, and Double Mirror
9 - Open-element PDS_W element8, copy and paste as new layer and resize to 250 pixels. Cole once again and resize to 200 pixels. Straighten both at the top left of the frame. Close the visibility of the first
9 - Open-element PDS_W element8, copy and paste as new layer and resize to 250 pixels. Cole once again and resize to 200 pixels. Straighten both at the top left of the frame. Close the visibility of the first
10 - Open-element PDS_W element5, copy and paste as new layer. Resize 50%. Place in center of frame or wherever you prefer
11 - Open-element14 PDS_W element, resize to 450 pixels. Copy and paste as new layer below the mask. Position on the left side, duplicate and mirror
12 - Apply Drop Shadow on all elements in the configuration: 4 / 3 / 40 / 6.00
13 - Sign and the credits, will move to AS layers
14 - Close the greater visibility of the spider and the radius of the right. Copy Merged in other layers and the Animation / Paste After Current Frame. Return to the PSP, close the previous layers and open the greater visibility of the spider and the radius of the right. Copy Merged and Animation, Paste After Current Frame. Select all the frames and set the Frame Properties to 50. Here's how the animation and save as Gif.
::: I hope you've liked it:::
Until the next tutorial!
Until the next tutorial!
Credits:
Art and Formatting by Maryclover
Tutorial by Maryclover
http://maryclovertagsetutos.blogspot.com/
Tube: ©Amberly Berendson
Scrap kit: Wicked by PolkaDot Scraps by Chassity
http://polkadotscraps.blogspot.com/
Font: JoliScript
Created by Maryclover® in October 19th, 2010
http://maryclovertagsetutos.blogspot.com/
Tube: ©Amberly Berendson
Scrap kit: Wicked by PolkaDot Scraps by Chassity
http://polkadotscraps.blogspot.com/
Font: JoliScript
Created by Maryclover® in October 19th, 2010
NOT PERMITTED: Rename, edit or convert my Stats on Tags.
You may not modify my creations and remove my credits.
Any resemblance to another tutorial is purely coincidental.
All material used in my tutorials are free, except when it is created for Designers' CT.
It is forbidden copy in whole or in part, or rewrite your credit as my tutorials.
It is forbidden to publish in groups, websites or blogs without my permission, to contact both the e-mail marirbarbosa85@gmail.com
If you run the tutorial do not forget to give credit for putting my name and link of the page http://maryclovertagsetutos.blogspot.com/
This and other tutorials are part of my blog http://maryclovertagsetutos.blogspot.com/
By using the formatting is consistent to keep the credits.
No Copyright Infringement Intended
Personal Use Only - Not For Profit!
TWI Proud Member
You may not modify my creations and remove my credits.
Any resemblance to another tutorial is purely coincidental.
All material used in my tutorials are free, except when it is created for Designers' CT.
It is forbidden copy in whole or in part, or rewrite your credit as my tutorials.
It is forbidden to publish in groups, websites or blogs without my permission, to contact both the e-mail marirbarbosa85@gmail.com
If you run the tutorial do not forget to give credit for putting my name and link of the page http://maryclovertagsetutos.blogspot.com/
This and other tutorials are part of my blog http://maryclovertagsetutos.blogspot.com/
By using the formatting is consistent to keep the credits.
No Copyright Infringement Intended
Personal Use Only - Not For Profit!
TWI Proud Member
sexta-feira, 15 de outubro de 2010
Tutorial Blood Lust
Tweet

1 - Open the template missy_tagtemplate30, duplicate (Shift + D) and close the original. Paint the background color: # c0c0c0
2 - Open ele38 element, resize to 450pixels. Copy and paste as new layer above the background. Straighten the right side, duplicate and mirror. Straighten the two layers called line 1 and line 2 as the preferred tag. Then duplicate and arrange as shown in the tag. Then go to Image / Mirror
3 - Click on the Frame layer, go to Selections / Select All / Float / Defloat and add a new layer. Paint it black. Click on the layer and delete the original frame
4 - Click on the brush by Agi layer and apply Drop Shadow settings: 4 / 3 / 40 / 5.00 in white.
5 - Click on a bar layer and repeat the previous procedure (step 4)
6 - Open ele44 element, resize to 450 pixels. Copy and paste as new layer above the layer and arrange Rectangle. Apply the same Drop Sadown previous
7 - Click on the rectangle layer, go to Selections / Select All / Float / Defloat and add a new layer. Open the paper PP9, 500 pixels to resize, copy and paste as new layer above it. Press Delete. Selections / Select None. Click on the layer and delete the original rectangle.
9 - Open the tube you choose, copy and paste as new layer. Resize as desired and arrange the template
9 - Open ele40 element, copy and paste as new layer. Resize 45%. Straighten the lower left side of the template
10 - Open ele6 element, copy and paste as new layer above the rectangle with the paper. Resize to 400 pixels. Arrange as you like.
11 - Open the elements and ele48 ele59, copy and paste as new layer. Resize both 100% and position them on the top right of the template
12 - Open element ele10 ele14 and copy and paste as new layer. Resize to 100 pixels. Position the lower left side of the template, and duplicate both straighten and mirror
13 - Copy and paste the tube back above the layer of the rectangle, the rectangle and leave only the profile. Then paste the tube once more and go to Image / Mirror. Delete scraps that were left outside the frame of the two rectangles. In duplicate layer of the tube profile, go to adjust / blur / Gaussian blur and set 3. In the same layer change the blend mode to Overlay in the profile and right profile for the Hard Light from the right and leave the opacity at 71. In the original layer of the profiles to change the blend mode to screen and apply the plugin Xero / Radiance and set the preferred option in Random and match more with the tube. Click Ok
14 - Apply the Drop Shadow settings: 4 / 3 / 40 / 6.00 on all elements in the tube and choosing the color white in the shade. Adjust apply / sharpeness / Sharpen
15 - Open-CIZ element IrishPride-Moon2, copy and paste as new layer. Resize as desired and arrange on the tag
16 - Apply Drop Shadow in all elements of the scrap kit and the tube under the same previous settings
17 - Sign and the credits and go to Layers / Merge All and save to Jpeg.

Materials:
A tube of your choice. I used the FTU tube by ©Hellonlegs, HERE
I have artist's permission to make tutorials using her art. You can see her Journal HERE
Scrap kit PTU Blood Lust by Pink Princess Scraps, that you can purchase HERE
missy_tagtemplate30, that you can get HERE
Plugin Xero
Program PSP X or higher
Font used: McBooHmk
I have artist's permission to make tutorials using her art. You can see her Journal HERE
Scrap kit PTU Blood Lust by Pink Princess Scraps, that you can purchase HERE
missy_tagtemplate30, that you can get HERE
Plugin Xero
Program PSP X or higher
Font used: McBooHmk
Let's Go!!!
2 - Open ele38 element, resize to 450pixels. Copy and paste as new layer above the background. Straighten the right side, duplicate and mirror. Straighten the two layers called line 1 and line 2 as the preferred tag. Then duplicate and arrange as shown in the tag. Then go to Image / Mirror
3 - Click on the Frame layer, go to Selections / Select All / Float / Defloat and add a new layer. Paint it black. Click on the layer and delete the original frame
4 - Click on the brush by Agi layer and apply Drop Shadow settings: 4 / 3 / 40 / 5.00 in white.
5 - Click on a bar layer and repeat the previous procedure (step 4)
6 - Open ele44 element, resize to 450 pixels. Copy and paste as new layer above the layer and arrange Rectangle. Apply the same Drop Sadown previous
7 - Click on the rectangle layer, go to Selections / Select All / Float / Defloat and add a new layer. Open the paper PP9, 500 pixels to resize, copy and paste as new layer above it. Press Delete. Selections / Select None. Click on the layer and delete the original rectangle.
9 - Open the tube you choose, copy and paste as new layer. Resize as desired and arrange the template
9 - Open ele40 element, copy and paste as new layer. Resize 45%. Straighten the lower left side of the template
10 - Open ele6 element, copy and paste as new layer above the rectangle with the paper. Resize to 400 pixels. Arrange as you like.
11 - Open the elements and ele48 ele59, copy and paste as new layer. Resize both 100% and position them on the top right of the template
12 - Open element ele10 ele14 and copy and paste as new layer. Resize to 100 pixels. Position the lower left side of the template, and duplicate both straighten and mirror
13 - Copy and paste the tube back above the layer of the rectangle, the rectangle and leave only the profile. Then paste the tube once more and go to Image / Mirror. Delete scraps that were left outside the frame of the two rectangles. In duplicate layer of the tube profile, go to adjust / blur / Gaussian blur and set 3. In the same layer change the blend mode to Overlay in the profile and right profile for the Hard Light from the right and leave the opacity at 71. In the original layer of the profiles to change the blend mode to screen and apply the plugin Xero / Radiance and set the preferred option in Random and match more with the tube. Click Ok
14 - Apply the Drop Shadow settings: 4 / 3 / 40 / 6.00 on all elements in the tube and choosing the color white in the shade. Adjust apply / sharpeness / Sharpen
15 - Open-CIZ element IrishPride-Moon2, copy and paste as new layer. Resize as desired and arrange on the tag
16 - Apply Drop Shadow in all elements of the scrap kit and the tube under the same previous settings
17 - Sign and the credits and go to Layers / Merge All and save to Jpeg.
::: I hope you've liked it:::
Until the next tutorial!
Credits:
http://maryclovertagsetutos.blogspot.com/
Tube: ©Hellonlegs
http://hellonlegs.deviantart.com/
Scrap kit: PTU Blood Lust by Pink Princess Scraps
http://pinkprincessscraps.blogspot.com/
Font: McBooHmk
Created by Maryclover® in 15th October 2010
TOU!
Until the next tutorial!
Credits:
Art and Formatting by Maryclover
Tutorial by Marycloverhttp://maryclovertagsetutos.blogspot.com/
Tube: ©Hellonlegs
http://hellonlegs.deviantart.com/
Scrap kit: PTU Blood Lust by Pink Princess Scraps
http://pinkprincessscraps.blogspot.com/
Font: McBooHmk
Created by Maryclover® in 15th October 2010
TOU!
NOT PERMITTED: Rename, edit or convert my Stats on Tags.
You may not modify my creations and remove my credits.
Any resemblance to another tutorial is purely coincidental.
All material used in my tutorials are free, except when it is created for Designers' CT.
It is forbidden copy in whole or in part, or rewrite your credit as my tutorials.
It is forbidden to publish in groups, websites or blogs without my permission, to contact both the e-mail marirbarbosa85@gmail.com
If you run the tutorial do not forget to give credit for putting my name and link of the page http://maryclovertagsetutos.blogspot.com/
This and other tutorials are part of my blog http://maryclovertagsetutos.blogspot.com/
By using the formatting is consistent to keep the credits.
No Copyright Infringement Intended
Personal Use Only - Not For Profit!
TWI Proud Member
You may not modify my creations and remove my credits.
Any resemblance to another tutorial is purely coincidental.
All material used in my tutorials are free, except when it is created for Designers' CT.
It is forbidden copy in whole or in part, or rewrite your credit as my tutorials.
It is forbidden to publish in groups, websites or blogs without my permission, to contact both the e-mail marirbarbosa85@gmail.com
If you run the tutorial do not forget to give credit for putting my name and link of the page http://maryclovertagsetutos.blogspot.com/
This and other tutorials are part of my blog http://maryclovertagsetutos.blogspot.com/
By using the formatting is consistent to keep the credits.
No Copyright Infringement Intended
Personal Use Only - Not For Profit!
TWI Proud Member
sábado, 9 de outubro de 2010
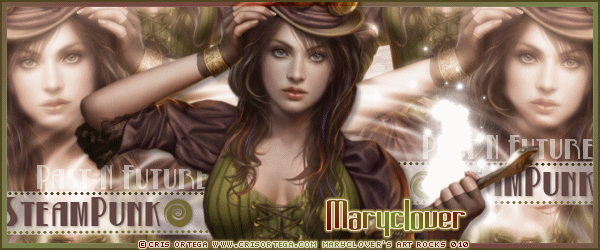
Tutorial SteamPunk
Tweet


Materials:
A tube of your choice. I used the tube FTU by ©Cris Ortega, you can get part of groups that have permission from the artist to use his art. Example of a group that I belong and that is allowed: DragonsLairTubes HERE
Scrap kit PTU Steampunk by Sky Scraps Designs, that you can purchase HERE
Masks 318InsatiableDreams and Vix_Mask205, that you can get HERE and HERE
A font of your choice. I used a font called Long Cool Grandma
Programa PSP X or higher (you can use older versions too)
Let's Go!!!!
1 - Open a transparent image 600 X 500 and paint in white
2 - Open the paper SkyScraps-AS-pp2, copy and paste as new layer. Apply the mask 318InsatiableDreams and Merge Group. Open the paper SkyScraps-AS-PP4, copy and paste as new layer. Apply the mask and Vix_Mask205 Merge Group
3 - Open the frame SkyScraps-AS-F1, copy and paste as new layer. Resize 80%. Click on it with her wand and go to Selections / Modify / Expand and place 7. Go to Selections / Invert
4 - Open the role SkyScraps-AS-PP9, copy and paste as new layer below the previous frame. Resize to 400 pixels. Press Delete. Selections / Select none
5 - Open element SkyScraps-AS-E27, copy and paste as new layer and resize 50%
6 - Open the tube you choose, copy and paste as new layer. Resize as desired and arrange on the frame.
7 - Open-AS-element SkyScraps Cluster5, copy and paste as new layer. Straighten the lower right corner, or wherever you prefer. Resize 55%. Lean a little to the left with the Deform tool
8 - Open element SkyScraps-AS-E3B, copy and paste as new layer. Resize 50%. Straighten the right corner of the frame. Duplicate and Mirror
9 - Open element SkyScraps-AS-E25, copy and paste as new layer above the frame. Resize 60%. Place on the upper side of the larger frame. Lean a little to the left with the Deform tool and fix.
10 - Open element SkyScraps-AS-WA1, copy and paste as new layer and position in the bottom right of the tag. Resize 60%. Apply in Sharpen Adjust / Shapeness / Sharpen
11 - Apply Drop Shadow on all elements in the configuration: 4 / 3 / 40 / 5.00
13 - Sign and tag in the credits. Apply Sharpen all elements except the tube. Go to Layers / Merge / Merge All to Save Jpeg.
:::I hope you've liked it:::
Until the next tutorial!
Until the next tutorial!
Credits:
Art e Formatting by Maryclover
Tutorial by Maryclover
http://maryclovertagsetutos.blogspot.com/
Tube: © Cris Ortega
www.crisortega.com
Scrap kit: PTU Steampunk by Sky Scraps Designs
http://Skyrosemelody.blogspot.com
Font: Long Cool Grandma
http://maryclovertagsetutos.blogspot.com/
Tube: © Cris Ortega
www.crisortega.com
Scrap kit: PTU Steampunk by Sky Scraps Designs
http://Skyrosemelody.blogspot.com
Font: Long Cool Grandma
Created by Maryclover in 09th October 2010
NOT PERMITTED:
Rename, edit or convert my Stats on Tags.
You may not modify my creations and remove my credits. Any resemblance to another tutorial is purely coincidental.
All material used in my tutorials are free, except when it is created for Designers' CT.
It is forbidden copy in whole or in part, or rewrite your credit as my tutorials.
It is forbidden to publish in groups, websites or blogs without my permission, to contact both the e-mail marirbarbosa85@gmail.com
If you run the tutorial do not forget to give credit for putting my name and link of the page http://maryclovertagsetutos.blogspot.com/
This and other tutorials are part of my blog http://maryclovertagsetutos.blogspot.com/
By using the formatting is consistent to keep the credits.
Rename, edit or convert my Stats on Tags.
You may not modify my creations and remove my credits. Any resemblance to another tutorial is purely coincidental.
All material used in my tutorials are free, except when it is created for Designers' CT.
It is forbidden copy in whole or in part, or rewrite your credit as my tutorials.
It is forbidden to publish in groups, websites or blogs without my permission, to contact both the e-mail marirbarbosa85@gmail.com
If you run the tutorial do not forget to give credit for putting my name and link of the page http://maryclovertagsetutos.blogspot.com/
This and other tutorials are part of my blog http://maryclovertagsetutos.blogspot.com/
By using the formatting is consistent to keep the credits.
No Copyright Infringement Intended
Requests open: Forum set and ava SteamPunk!
Tweet
Hyia ladies, I just finished this set and ava below inspired by SteamPunk theme, and I used the amazing FTU tube by Cris Ortega. I hope you all like them. If someone wants to request them just send me an e-mail: marirbarbosa85@gmail.com, and tell me the name you want on the banner and ava. No big names, please. Open only until Tuesday 12th. Thanks so much for looking!
Best Regards,
XOXO.

XOXO.
Assinar:
Postagens (Atom)


